|
The Art of Demomaking - Issue 09 - Static Texture Mapping by (18 October 1999) |
Return to The Archives |
Introduction
 |
|
It's funny how I always struggle to find a good starting sentence ;) Well, this week we will learn more texture mapping, and how the simplest effects that use texturing work. I will also explain how the classic tunnel effect is done. And finally, I will tell you about using main loops in assembler. |
|
What Is A Texture
|
|
A texture is usually a square bitmap, with a size that is a power of two, most of the time 256x256. You can apply a texture to virtually anything, as long as you can come up with an algorithm that can map a texture onto it. That includes polygons, spheres, planes... The trick obviously is to get it running quick enough to be realtime. A nice characteristic that a texture can have is being seamless. This means that if you repeat your texture the edges will align. This is what you need in most cases. The following figure shows a seamless texture: 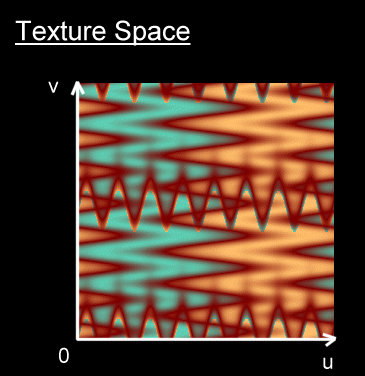 The u and v coordinates are used to address the texture's texels. They define what we call texture space. If you specify u and v within the range [0,1] then you'll get the corresponding texel in the texture. Anything outside that range will wrap round, and you will get the corresponding texel with modulous arithmetic. |
|
Static Texture Mapping
|
|
This is a very easy technique, used mainly because it is extremely fast. The basic idea is that you precalculate the (u,v) pairs for each pixel, and in realtime you just add a texture displacement (du,dv) which moves the texture. This technique can be used to create tunnels that don't change shape, flowers, kaleidoscopes... It's a lot slower to use this same technique in realtime, so other techniques are usually used. Basically we load our precalculated texture coordinates, add some time related constants to them, fetch the corresponding texel and store the pixel. In our case texture coordinates are in the range [0..255]. This is how simple the main loop is:
Of course you could combine different layers of textures, and mix them in real time. You'd use a combination of this main loop, and the cross fader we coded in week two. |
|
Generating Interesting Patterns
|
|
There is absolutely nothing difficult about the main loop. The secret of this effect resides in how good your generated patterns looks. For example, a flower you could calculate u given the distance to the centre, and v given the angle of rotation. You can also add some interesting sine functions to make the pattern look less boring. The effects looks even better if you generate some 3D data, like a tunnel. This takes a bit more time to pre-compute. But this doesn't really matter since it's not in the main loop, and you could always store it as a bitmap. I'll vaguely describe how I did this, but won't get into much detail since it's all about raytracing, and it could get a bit confusing to some of you. You could always look at the source for additional information. The idea is that for each pixel you find the equation of the corresponding ray, and find it's intersection with the tunnel you defined. Given that intersection, you compute u given the angle of rotation, and the v component given the depth. 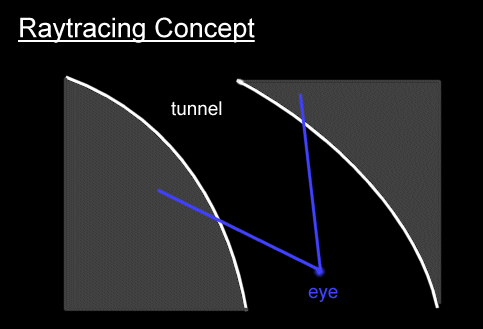 Don't panic if you don't understand the raytracing part, it's not too important. The key here is that you can apply your texture to any shape you like, as long as you can describe it with a mathematical formula. |
|
Assembler Or Not Assembler
|
I've been debating whether to include an explanation on using assembler in main loops or not... There are many arguments that support it, and not quite as many against. But i'll leave it up to you to decide if you want to learn about it or not.
DisadvantagesI personally recommend using assembler for main loops, if you have the extra time. Once you get enough experience, you'll be able to knock up fully assembler main loops in very little time indeed ;) Of course, you could decide to skip this next part, and you wouldn't suffer from it in the next tutorials. I won't mention it again.Advantages |
|
Using Assembler For Main Loops
|
|
Well thanks for reading this section... you won't regret it. The first thing you need to do is to get the best assembler compiler around, which happens to be free. It's called NASM, and you can get it from here. Simply extract the zip, and put NASM.EXE into your path somewhere: C:\DJGPP\BIN would be good. Read the included text files for more information. NASM can compile INTEL assembler code into virtually any binary format, and on virtually any platform. So all you learn for DJGPP you will be able to use with MSVC also. The generated object files can then easily be linked into your main programs. The next thing to do is to get a very nice tutorial on Assembler, called The Art Of Assembler. I don't recommend going through it all, it would take you a while, and you wouldn't need all that information to program just a main loop. The best way to learn is to read some source code, and look up anything you don't understand. So I'll take my own advice and go through the source with you ;) This should give you a nice template you can use when creating your own main loops.
This first part tells NASM we want to use 32 bit code.
This is how we define our procedure, so that we can link it with other programs. The __FPUcUcUc suffix is a standard C++ calling convention, to take into account function overloading. All you need to do is add __F at the end of your function name, to tell the linker it's a function, and then tell it what the parameters are:
You can of course forget all these extensions, and just define the procedure as an external C function. Another problem we run into while linking is accessing external variables.
We just define their names here, and make sure we use them correctly in our code.
That's how you define local variables.
We tell NASM this is the part that contains the actual code.
We define some constants that point to our parameters on the stack. This makes things easier to understand later.
We start our main loop.
We save the register ebp and use it to address the stack (esp), where our parameters are.
Save all the other registers, so that we can exit the procedure in the same conditions we entered.
edi now contains the address of the buffer we're drawing into.
esi now contains the address of the buffer containing our (u,v) coordinates.
ebx contains a segment aligned address, which means only the higher 16 bits of the address are used. The lower 16 bits address the texels.
We load the texture displacement into dx.
Setup our loop counter to cover all 64000 pixels.
That's how simple the main loop is ;) The trick here is the segment aligned buffer in ebx. ebx is 32 bits, and only the higher 16 bits contain the address. The lower 16 bits of ebx (i.e. bx = (bh<<8) + bl ) are used to address the texels, so no extra operation is needed to address the texels.
Restore all the registers and return. |
|
Final words
|
|
Now you understand the basis of texture mapping works, there's not much you don't know about creating effects. All there is left is to cover are slightly more elaborate techniques for texture mapping, which we should cover some time soon. Assembler used to be a standard for most demos in the past, but most people nowadays don't really care anymore. I still strongly recommend that you learn about it, since all the knowledge you will gain of low level hardware will be extremely useful. I'd also like to point out the fact that the demo runs 80% quicker with the assembler loop, and there's a lot of room for improvement, like writing 4 pixels at once. Oh yeah, I promised you something on profiling last week. Don't worry, I haven't forgotten, I've just delayed it until next week. Next time we will also learn about roto zoomers, and more about visual performance testing. Feel free to download this week's example with source code right here (141k) Enjoy, Alex |