|
The Art of Demomaking - Issue 05 - Filters by (20 September 1999) |
Return to The Archives |
Introduction
 |
|
Before we start, I'd like to thank you all for the interest you've shown in this column. Your support is appreciated ;) Last week you learned how to create a frame of plasma given some parameters that evolved over time. Another way to create effects is to use the previous frame to generate the current frame. Filters are ideal to do this. We will code a simple fire effect based on this technique. |
|
Filters
|
A filter can be applied to any image, to create another image. Those of you that are familiar with Paint Shop Pro or Photoshop will know what I mean. A filter can be described as a matrix, usually of size 3x3 or 5x5, containing real numbers, and a divisor. Here's a random example.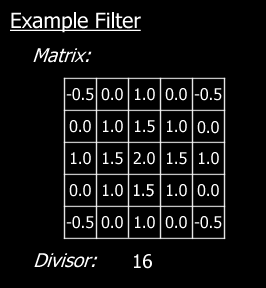 To apply this filter to an image, we take each pixel of that image, and centre our matrix on that pixel. Then, for all the pixels that lie within the range of the filter, we multiply the colour components by the corresponding value inside the matrix. We add all the results together and divide the total by the divisor, and store the final result in out destination image. |
|
The 2D Fire Concept
|
|
An easy way to think of a fire is to consider it as a 2D buffer, that contains a heat map. So each pixel in the buffer would store the temperature at that location: 0 being the coldest, 255 being the hottest We can then create a palette containing fire-like colours to assign to that heat map. The following palette produces nice, but slightly unrealistic fires.  |
|
The Fire Filter
|
So the question is, how do we define the fire filter to apply to the heat map? Well, we want the heat to propagate upwards, and to lose intensity. The following filter does that very well. 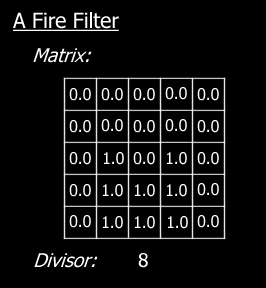 Notice the divisor is 8. It was chosen specially since dividing by 8 can be done extremely quickly with a bit shift. Notice also that all coefficients are 1, so no multiplications are involved. |
|
Lighting The Fire
|
|
We are now able to calculate a frame of fire given the previous one. But we need to generate the first frame. We do this by simply setting some "hot spots" at the bottom of the fire. The heat will propagate upwards from there on. We can also randomly add hot spots at the bottom while the fire is going, in order to keep it burning. As you will notice in the demo, I also add random hot spots that draw some text onto the screen. You can place hot spots virtually anywhere, just use your imagination to find original or realistic ways to heat the buffer. You could also have a cooling map. Each frame, you would substract the value in the cooling map from the heat map. This method can produce some less boring fires. I didn't implement that in the demo, so it's up to you. The secret is to find a nice equation to generate the cooling map. It's just like generating a low intensity plasma buffer (refer to last week's tutorial). |
|
The Problems
|
|
You must be thinking that all this seems a bit too easy... Well, indeed there are some major drawbacks of using filters to create effects. Since we use the previous frame to generate the next one, our output will be frame rate dependent. And this is not good (see the tutorial on Time Related Issues). A simple solution would be to implement a frame rate limit, so that the effect never runs too quickly. But the obvious problem is for slower PCs, since we can't skip frames. My conclusion after a few years of experience is to try to avoid frame rate dependent effects. Admittedly, this is not always possible, but the only alternative you are left with is to make sure your main loop is very quick, so that most PCs will be able to run it at the intended speed. |
|
Portable Network Graphics
|
|
If you look at the ZIP containing the source, you will notice it no longer contains *.RAW files, which contained buffers directly dumped to disk, but *.PNG files. The Portable Network Graphics format is great, I personally consider it the best around. Fair enough, it doesn't compress as much as with JPEG files, but it's compression is lossless. And this is very important. If your artists spends time creating some artwork, you definitely don't want it to lose most of it's quality by JPEG compressing it. And please don't email me saying that I could have used JPEG compression for most of my examples because the images provided are appalling... It's true but i don't really want everyone to remind me :) The example uses libpng to load PNG files. libpng is an extremely well written, reliable, quick and portable library that you can use freely. You can download the latest version of the library at the PNG home page at http://www.cdrom.com/pub/png/. You will also need to download zlib available from the same place. zlib is used to compress the information written in png files. Once you have the archive of both libraries, extract them both into a seperate directory. libpng expects to find zlib at the same level so make sure you extract them like so:
First compile zlib. Go into the zlib directory and copy the file zlib\msdos\makefile.dj2 into zlib\makefile.dj2. Then simply type "make -f makefile.dj2", and wait for a little while. Once that's finished go into the libpng directory and copy the file libpng\scripts\makefile.dj2 into libpng\makefile.dj2. Likewise type "make -f makefile.dj2", and wait a while longer. And do not go for a smoke, those things will kill you :) If you have installed DJGPP properly, you should run into no problems. You will now have two library files called libz.a and libpng.a. Copy those two files to your djgpp\lib directory. Also copy the files png.h pngconf.h zlib.h zconf.h to djgpp\include. This will make things much easier in the future. You should now be able to compile the example provided without any trouble:
And that's it. If you ran into trouble, either DJGPP is not correctly installed, or you forgot to do something... I recommend reading through the provided README files anyway, that should help. Definitely don't give up. Being able to use libpng will be an important advantage in the future, and not only for this column. |
|
Final words
|
|
This week you learned how to create effects with filters. Filters are a quite simple way to create good looking effects. Once again, all you need is a bit of imagination to create good filters. We also learned why the use of filters should be avoided if possible, since the output is frame rate dependent. By checking the source, you will also learn how to use libpng to read PNG files. Next week, we will learn about bitmap distortion, and bilinear filtering. This week's example with source code can be downloaded right here (106k). Happy Coding, Alex |