 |
Source Documentation with Doxygen
Submitted by |

I used to maintain that good code is self-documenting. While I still believe that to a certain extent, such thinking makes a lot of assumptions about the person(s) who may be reading the code. As your project grows larger and additional programmers of varying skill levels (and areas of expertise) come on board, the need for good commenting and documentation becomes pretty clear.
This mini-article will explain the very basics of setting up Doxygen,
a completely free, cross-platform and extremely handy source code documentation tool.
There's nothing new or fascinating in this article that's not either common sense or in the manual of Doxygen, but I figure
people are more likely to at least give it a shot if they see some quick examples of how simple it is to use.
So you might be wondering: isn't good commenting enough? Why should you bother use a
documentation tool like Doxygen? Here are a couple things to consider:
The resulting documentation is nicely formatted in human language, allowing you to quickly see the 'big picture'
view of your project all the way down to the specific expectations of your function parameters.
Using a documentation tool encourages you to actually comment your code consistently!
Using a documentation tool "forces" a specific commenting format and style, which is pretty nice for those
of us who constantly change styles. Even if you don't need actual documentation right now, its a good idea to consider using a commenting style that's at least compatible with tools like Doxygen to save time in the future if you ever need it.
The end user of the code may not have access to the original source code (for example by using a library), and thus he won't have access to the original source code comments. You can also mix styles to ensure that only the comments you want them to see show up in the resulting documentation.
Automatic "help file" generation for libraries and other such projects is a huge time saver AND ensures that your manual is consistent with changes in the code.
Sounds fun, eh? So lets start. First off, assuming you're running Windows, run over and
scoop up the latest installer of Doxygen.
It has a friendly interface that I'm sure you can handle.
Once installed, you can either edit a configuration file manually or use the Doxygen wizard.
Both approaches are very straight-forward. Once you've created a configuration file for your project, you simply call "doxygen.exe configfilename", and all
of your documentation is automatically generated.
To actually comment your code, there are number of supported styles. The most popular is
probably the JavaDoc format, which looks like this:
/**
 *  This function does absolutely nothing important.
 */

bool exampleFunction(const std::string &str)
{
    return true;
}
|
To document things like parameters and return values, you can do stuff like this:
/**
 *  This function does absolutely nothing important.
 *  @param str The answer to all things.
 *  @return True or false?  That is the question dear friends.
 */

bool exampleFunction(const std::string &str)
{
    return true;
}
|
There are several other commenting formats that are supported, all of which are documented in the Doxygen manual,
but the more important thing to keep in mind is just that you'll be using a largely uniform commenting style throughout your project.
And this is how the HTML looks after you run doxygen:
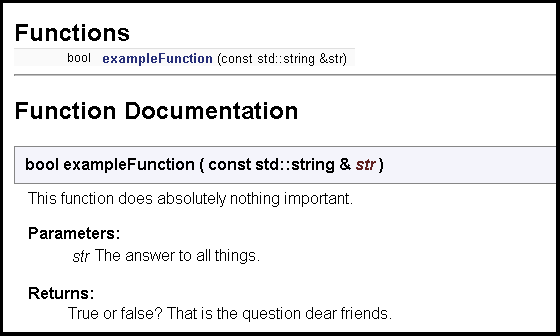
Clean and simple. And this is just the tip of the iceberg. The doxygen manual explains the many other features, such as the generation of diagrams and visual hierarchies.
One other little thing I'll mention is that for my own projects, I added a custom tool menu item in MSVC6's IDE via the Customize menu. The parameters are:
Rebuild Doxygen Documentation
Command: [ the location of doxygen ] \bin\doxygen.exe
Arguments: $(WkspDir)\doc\$(WkspName).config
Initial Directory: $(WkspDir)\doc\
|
For each project, I just name my initial config file the same as the root workspace name, and my documentation always goes in the 'doc' directory. That way the custom tool works without modification for any new project I'm working on, and all of the doxygen processing output shows up directly in the IDE.
That's about it.
In this mini-article I've talked about code documentation using Doxygen simply because that's the one I like best from what I've seen. There are plenty of other documentation systems out there, so have a look around if you're curious.
|
The zip file viewer built into the Developer Toolbox made use
of the zlib library, as well as the zlibdll source additions.
|