|
Lightmaps (Static Shadowmaps) by (16 August 1999) |
Return to The Archives |
Introduction
 |
| This is a tutorial on how to generate and render with static lightmaps, as seen in most modern Quake-ish game engines. We'll start with the very basics. I've made some small changes and clarifications since this document was originally posted, based on reader feedback. |
|
What Is Lightmapping?
|
|
For our purposes, lightmapping can be loosely described as the process of using a lightmap,
essentially the same as a standard texture map, to store information about the illumination of
a surface. Each surface in our 3D polygonal world has its own lightmap, which obviously
makes things difficult for memory when you have large worlds. Typically the lightmaps
are stored at a lower resolution than the textures, for example 64x64 or 32x32, to keep things trotting along
nicely. The lightmaps are combined (multiplied) with the texture either at render time (if you're using
hardware rendering) or via a surface cache to produce what appears to be an "illuminated scene". Please note that in this document, I use the term 'surface' interchangeably with 'polygon' or 'triangle' as seen in most 3D engines. The texture and lightmap are typically not combined into one during the lightmap creation process because even though each surface has its own unique lightmap, it usually does not have its own unique texture. Take for example a room where all of the walls use the same brick texture. If you combined the lightmap and texture for each surface at lightmap creation time, you would be wasting an incredible amount of memory because you'd be making a new copy of the brick texture for each and every surface. That's often impossible (or just plain crazy) in most quake-style games because of the amount of texture re-use among surfaces. In addition, pre-combining the lightmaps and textures wouldn't allow a shadowed area to light up again (for example from a dynamic light in a game.) Here is an example of what a texture combined with its lightmap might look like.
|

|
How Do I Generate Lightmaps?
|
|
Please note that this section is on generating lightmaps, NOT lighting. You
can use any kind of lighting you want -- lambertian equation, radiosity, whatever --
that's up to you. This section will simply explain one way of doing it. The method
I'll describe below is assuming that you're calculating lighting values at each
sample point, but given that, it should be easy to extend it for whatever
your purpose may be. For starters
you need to create a blank new texture for each surface / polygon that you're working with.
Lets assume that we're dealing with one surface right now. You can make the texture's size based on any factors that you want, or even fix it at a certain size. A lot of engines will choose a maximum lightmap size, like 32x32, then calculate the size on that lightmap that the surface will need, keeping in mind a uniform density. If its found that a surface's required lightmap size is too large for that maximum size, the surface would be split into smaller pieces, each with their own lightmap. These considerations are important, because imagine if you had one tiny surface with a full 32x32 lightmap, and one gigantic surface with a lightmap of the same size. Your lit world will look a little strange because of the stretching and compacting of the texture. This topic can get somewhat advanced, so we won't really get into it here. Just keep in mind that several 3D cards require power-of-2 texture sizes. Obviously the same applies for lightmaps since they are in fact just textures. Now that you have your new lightmap allocated and ready for a particular surface, what we want to do is store a value at each lumel, referenced as a 2D point: lu, lv in the lightmap texture, that represents the illumination value at that location along the surface. Its a little hard to explain, but hopefully you see what I'm talking about. That's all well and good, but the most common question about generating lightmaps has got to be: How do I go from 2D lightmap coordinates to 3D world space so that I can calculate the intensity value for that lumel? You DO have access to the 3D points at the vertices, so its not entirely 2D texture coordinates to world space -- that would be impossible because many surfaces may have the same texture coordinates. So what you need is the 3D point that matches up with the 2D texture point. This bothered me for a while because I originally wanted an "exact" solution, using the exact orthogonal uv vectors for arbitrary surfaces; but as it turns out, an "exact" solution in many cases wouldn't look right because the textures don't line up. You want a uniform mapping across all of your surfaces. If you use the 'exact' texture plane of every surface to generate your lightmaps, it'll probably look "sort of" right since the 3D sample points are in the right world position, but you'll also find that its extremely difficult, if not entirely impossible, to make sure the lumels on every adjacent polygon line up. An offset of even a few pixels completely ruins the illusion of smooth and pretty lighting across surfaces. So then, how is it done? A more common solution is to use planar mapping. If you would like to know more about planar mapping, check out the archives on The Fountain Of Knowledge. Paul Nettle explains (in more than one response) how planar texture mapping works and why it is good. This would be nice to read if you don't know what I'm talking about right now. To generate the lightmaps, we basically do the following for each surface: Now you have the UV vectors and lightmap coordinates to do whatever you need. The actual sample point determination for each uv when generating the lightmap might look like the following in psuedo-code, unoptimized for clarity:
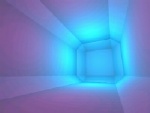
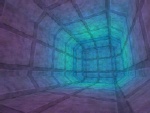
The sample point is in world space and that's what you'd use for the lighting. There are many obvious optimizations that you can make to the above, but the idea remains the same. I hope I didn't make any mistakes in the above explanation. If I did, its likely something I typed wrong or forgot to type because the algorithm works (as far as I know ;). This approach is very easy and the results look nice. Obviously the worst case would be when a polygon is slanted at 45 degrees to some plane, but it still doesn't look too bad. I was talking to a fellow coder, Luke Hodorowicz, about an approach like this that he's working on as well and he agrees that the skewing isn't really that noticeable even in those worst case situations; especially in conjunction with techniques like bilinear filtering. Again, the lighting performed at that sample point can be anything you wish, but to get your feet wet, if you want to use the lambertian lighting equation, you can: take your sample point and subtract that from the light position, normalize the result, then dot it with the (normalized) polygon normal. That's the bulk of the calculation. That dot product is the important one for lambert, and you can use it with as many other factors as you'd like, for example I have a distance/radius ratio in there. That's up to you -- experiment with it or look up the exact formula if you seek exactness. Often times in game programming, coming close enough to 'realistic' but fudging it with a hearty helping of 'looks good' sauce works nicely. Here's a quick example that I threw together for illustration purposes only:
The above scene is a triangle mesh with 77 verts and 44 faces. There's a very strong blue light and a faint purplish light as well. Note the difference in "realism" or "depth" between the plain textured version and the final version. |

|
Rendering With Lightmaps
|
|
I must admit that when I first implemented lightmaps several monthes ago, I was
already using 3D hardware for rasterization which means I've never written a surface cache
for software rendering, so you'll have to look elsewhere for information on that.
Its a straight-forward idea, so it shouldn't be overly difficult, but I
won't describe it here. Check the reference section at the end for links. I suppose you could still use a surface cache if you're using hardware, but its not really all that neccesary. Most 3D hardware these days can perform single-pass multitexturing (or you can resort to two seperate passes). This is what I use at this time. You simply need to set up your multitexturing function to multiply the texture and lightmap together at render time and you'll have your nicely illuminated surface. |
|
Other Questions & Answers
|
|
How do you generate color (RGB) lightmaps? Piece of cake. One way is to simply generate a "red", "green", and "blue" lightmap seperately (in the same loop of course) then combine and clamp them when you're finished. Using this approach you can easily use arbitrary rgb colored lights. How come I can see my lightmaps just as clearly as my textures after the final render? Heh, take a look at this screenshot... a portion of one of my very first lightmap shots (quite old).  That's part of the ceiling in a small world. See how you can clearly see the rings of the lightmap? I started getting nervous and began to think I should dither/filter/blur/something them. The reason for this is not that I was doing anything wrong. The answer, which my buddy Mr. Nettle mentioned to me a while back, is simply because those textures aren't textured enough. I grabbed those textures from a 'free web textures' site, and thus they're aimed at web site backgrounds, not games. If you view textures from various games such as Half-Life or Unreal, you'll noticed how very textured they are. This greatly improves the image quality when rendering with lightmaps. After kicking myself, I downloaded some free GAME textures to play with (references at the end of this doc) and of course everything looked beautiful. You can filter your lightmaps, and if you're using basic shadows (next question..), you definitely should. But to be honest, they still look great without it if your textures are sexy enough. At least to this coder. How do I handle shadows? That completely depends on how you're doing you're lighting. If you're using simple point light sources and simple lighting equation calculations, you can easily determine where shadows should be by checking, for each point in the lightmap, whether the light actually reaches this particular surface at this particular point (ie, if any other polygon in the level is blocking it or not). That involves much ray casting and many intersection tests which means its quite expensive, but keep in mind that this is all still computed offline and stored in the lightmap hence it won't really affect your actual rendering performance. This process can also be optimized fairly well with a few simple 3D tricks. If you use this approach for shadows, I highly recommend that you filter your resulting lightmaps to get rid of the hard edges and give the scene a much more natural look. This is of course not the only way to determine shadows. How do you do volumetric fog with lightmaps? This is another easy add-on when using a lightmap-ish architecture. You can use a seperate set of lightmaps (usually much smaller than the texture because the fogging is view-dependent and thus expensive to calculate repeatedly) and store fogging values, which are usually alpha values, then combine it with the actual surface at render time giving the illusion of volumetric fog. The fog values are determined by a few simple intersection tests with your fog volume. For more information, check out the the reference section at the end of this doc. |
|
Closing
|
| In this doc, I've attemped to explain the idea behind lightmapping as it is used in the majority of the modern 3D game engines currently on the market (fps engines anyway). The lighting itself and implementation details/concerns vary and are up to you, but hopefully you now understand how to generate and use lightmaps. I make no claims as to the validity of the info in this file. Its mostly from personal experience, so I could be wrong. There are as many ways to do this as there are kernels of popcorn on a crowded movie theatre floor, so if you've got a better approach or suggestions, by all means please let me know. Thanks for reading. |
|
Sources / Further Reading
|
|
Color & Lighting by John DiCamillo This is literally the only other site I ever remember seeing on the internet with solid info on light mapping until very recently. It does a nice job explaining the concepts, but its a few years old (using palettes and software rendering) and the psuedo-code has some html problems. Other than that, definitely check this one out if you're looking for a good introduction to lightmaps. The Fountain Of Knowledge: Lightmaps The Fountain entry on lightmapping by Paul Nettle has some solid information on planar mapping and the fundamentals behind lightmapping in response to a question that someone sent in. You can find this in the archives section. PolyGone: Various Lightmap Docs I came across these docs on Tobias Johansson's web site only very recently. There are some interesting ideas about light mapping including a piece by Warren Marshall which describes how to obtain the world space sample point using a bounding box. I haven't really read over these docs in detail yet, but if you're interested, you can find them there. Spherical Volume Fog This document covers volumetric fog (using fog maps) in much more detail than I mentioned. The Texture Studio Most of the textures I use in my engine demos came from this site (with permission). He's got some excellent game-ish texture pack releases available for download. Very highly recommended. KAGE Document On Surface Caching Here's another doc written by Paul Nettle, this time about surface caching in the KAGE engine. Again, I don't use a surface cache, but if you're interested in the topic then you might want to try here. Also, greets/thanks go out to various people that I've talked to about lightmaps and related topics. |
|
|